MEMJET PRINTHEAD CLEANING
THE STEPS BELOW ARE DEMONSTRATED ON THE AFINIA L801 PRINTER. HOWEVER, THE CONCEPTS AND STEPS CAN BE USED FOR ALL MEMJET PRINTHEADS AND PRINTERS.
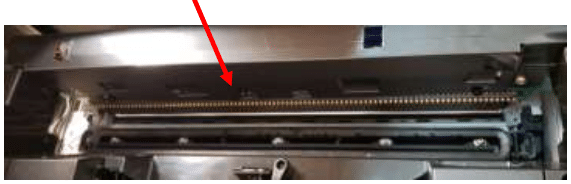
At times you may encounter print quality issues such as streaking in the artwork or text of your labels. There are a few possible causes for this including dirty contacts, clogged ink nozzles, static build-up or simply an old printhead that needs to be replaced.
Most of these issues relate to the build-up of ink within the body of the printer and can be resolved with a few simple troubleshooting steps.
The following steps will guide you through the most common troubleshooting steps to resolve your print quality issues.
STEP 1 – NORMAL CLEAN
First, try the “normal” clean function of the Afinia Memjet printer a few times. This function can be found from the printer’s front control panel by navigating through these menus:
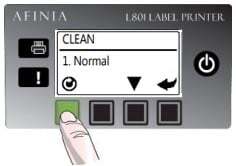
Configuration (Gear icon) → Printhead (Item #3) → Clean (Item #1) → Normal (Item #1)
Once the “Normal” clean is completed, try to print again. If you see a slight difference but still notice streaking, repeat the normal clean process until the streak is gone. Go to step 2 if white streak(s) continue beyond the third or fourth cleaning.
STEP 2 – EXTENDED CLEAN
The extended clean function can be used if numerous attempts at “Normal” clean don’t resolve your print quality issues. Multiple extended clean cycles can be used if you notice an improvement after each one. This function can be found from the printer’s front control panel by navigating through these menus:
Configuration (Gear icon) → Printhead (Item #3) → Clean (Item #1) → Extended (Item #2)
After each “Extended” clean is completed, try to print again. If you see a slight difference but still notice streaking, repeat the extended clean process until the streak is gone. Go to step 3 if the white streak(s) continue beyond the third cleaning.
Memjet printers contain a wiper roller that moves up to clean the printhead during it’s normal servicing cycle. This wiper roller can become saturated with ink and worn out over time. If this happens, it’s like using a washcloth for too long. Eventually, the wiper roller will start transferring ink back to the printhead because it cannot hold any more ink or has been damaged from overuse.
For this reason, it is recommended to replace the wiper roller with every printhead for heavy use printers or every other printhead for lighter use printers. Some of the indicators for needing to change the wiper roller are:
- Color streaking, or “ribbons” of color that look faded or different colors from the rest of the label
- Streaking that improves after cleaning but returns shortly after the cleaning
- Colors fading or changing on labels during the course of a print job or between print jobs
Wiper roller replacement is fairly simple but does require some instruction to complete properly without damaging the printer. Once you do it the first time, you’ll be able to repeat the process easily in the future.
Contact us if you would like to purchase a replacement wiper roller or would like free instructions and tips on making this replacement.
VIDEO: How to Change Your Wiper Roller
STEP 3 – ADVANCED CLEAN
- From the front panel of the printer, select Configuration → Printhead → Replace. This will release the blue latch.
- Hold the printhead over a sink and tilt the printhead with the nozzle side up and at a slight angle. Be careful for spilling ink. Using distilled or deionized water only, spray the nozzles directly or pour the water down the printhead being sure to saturate the nozzles and gold contacts. Apply enough water to wash any excessive ink from all areas of the nozzles and contacts. The nozzles may continue to “bleed” ink during this process. Removal of excess ink and saturation of the nozzles is the goal, not the complete elimination of all ink on the surface.

- Using a lint free cloth, wipe the gold contacts on the side. Avoid wiping the nozzle surface directly.
- Clean the printhead contacts using a lint free cloth. Gently wipe the pins in a very gentle up/down motion, being careful not to damage the pins.
STOP! Reinstall and test. If you still have streaking continue with the steps below.
5. From the printer’s front panel, select Configuration → Printhead → Clean → Extreme. Sometimes the extreme clean can worsen a printhead so use this and the following steps as a last resort before proceeding with the final rehydration steps below.
STOP! Reinstall and test. If you still have streaking continue with the following steps.
STEP 4 – REHYDRATION & MANUAL CLEANING
Rehydration of the printhead can help to clean and revive clogged nozzles and wash away pooling ink that might be blocking nozzles or electrical contacts.
- Follow the printhead eject steps again
- Pour a small amount of deionized or distilled water into the orange cap that came with the printhead. Place the printhead into the orange cap (be careful of overflowing water containing ink… it will stain!) and store overnight.
- After about 24 hours, remove the printed from the orange cap.
- Using a lint-free cloth soaked with deionized or distilled water, gently wipe the nozzle surface gently in one direction only with light pressure over the entire length of the surface. Please see this link for the small lint-free cloths we use in our facility (not an affiliate link). This may clear the nozzle if there is debris in it or may force rehydration more strongly than pouring the water over the nozzles if the nozzle is dry. It’s also something we don’t recommend doing unless everything else has failed, as direct contact with the nozzles can cause problems by itself.
PRO TIPWear rubber gloves and watch for spilling ink during the following steps to avoid ink stains on your skin, clothing and work area. - Print several test pages keeping in mind that some remaining water may show on these tests. A few test runs should allow for any remaining water to be removed before normal printing resumes.
FINAL STEP
If all of the previous steps do not work, the only remaining option is to replace your printhead with a new one.
Memjet printheads can be expensive to replace so recovering a faulty Memjet printhead is worth the effort. By following these cleaning steps, you can help to restore and extend the life of your Memjet printhead. If you have any questions related to this or anything else, please contact us at any time.
Afinia L502 Label Printer (Pigment)
Afinia L501/L502 Pigment Ink 4 Pack (CMYK)
Wifi Add On Kit 


